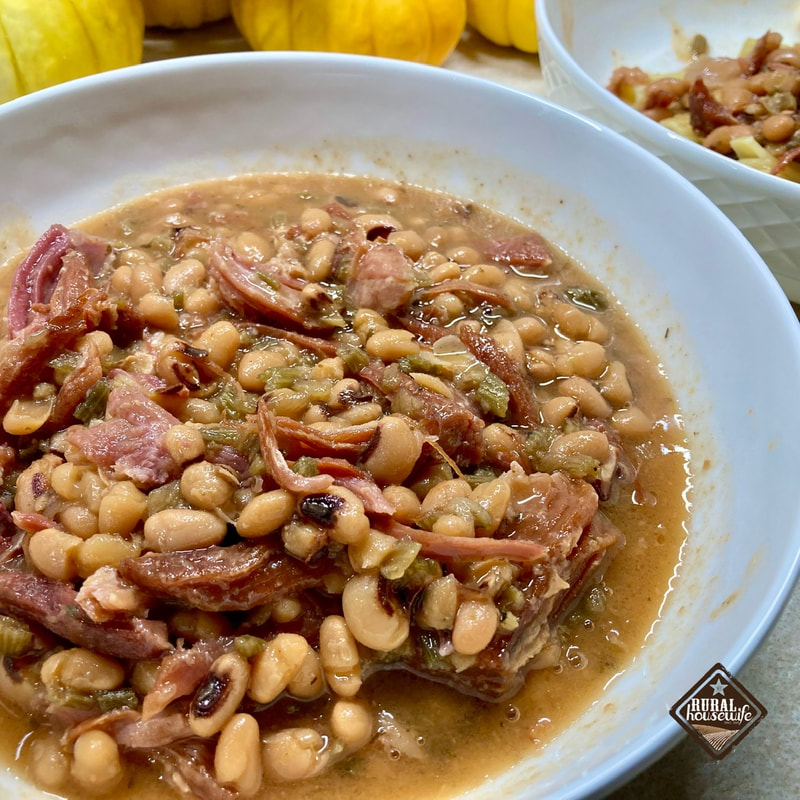
Rural Housewife
  • HOME
    • My Story
    • Contact Me
  • BLOG
  • WE LOVE
  • RECIPES
    • Baked Goods
    • Breakfast
    • Chocolate
    • Dinner
    • Gluten Free
    • Granola
    • Make Ahead Meals
    • Mexican Favorites
    • Sugar Free
  • RESOURCES
    • Canning
    • Dehydrating
    • Frugal Living
    • Gardening
    • Meal Planning
    • Old Fashion Living
    • Raising Chickens
    • Small Business Dir. >
      • Submit Your Business
    • PROJECTS >
      • Crafts & Gifts
      • Holidays >
        • Christmas
        • Halloween
        • Mother's Day
        • Valentine's Day
      • Photography
    • Winter Sowing

Blog

Coconut Probiotic Yogurt

7/1/2025

1 Comment

 
Did you know you can make Coconut Fermented Probiotic Yogurt at home? This is dairy-free, sugar free (the sugar that is added is for the cultures to develop, it doesn’t make this yogurt sweet), and probiotic rich.
Picture
Picture
What to Look For When Making Coconut Cream Yogurt at Home
Homemade coconut cream yogurt, inspired by probiotic-rich brands like Coconut Cult, is a rewarding way to create a tangy, creamy, gut-friendly treat. Using additive-free coconut cream, a high-potency probiotic starter, and a controlled fermentation setup (like a dehydrator at ~105°F), you can achieve a thick, custard-like yogurt packed with probiotics. But what should you expect during the process? This guide outlines the key stages -preparation, fermentation, and refrigeration - and the visual, sensory, and textural cues to look for to ensure success. Follow along to know your yogurt is on track!

Ingredients & Equipment
  • 2 cans (13.5 oz each) additive-free coconut cream (e.g., Thai Kitchen, Native Forest; just coconut and water, ~18-20g fat per 1/4 cup).
  • 2-3 tbsp high-potency probiotic starter (e.g., Coconut Cult yogurt or 2-4 capsules with 50-100 billion CFUs, containing Lactobacillus and Bifidobacterium).
  • 2 tsp organic sugar or maple syrup (optional, to feed probiotics and add subtle sweetness).
  • Optional thickener: 1 tsp tapioca starch or 1/2 tsp agar-agar for firmer texture.
  • Equipment: Sterilized glass jar (e.g., 1-quart with 1/3 headspace), blender or whisk, dehydrator (or yogurt maker/Instant Pot), cheesecloth for straining, thermometer (optional).

Preparation Stage: What to Look For
  1. Mixing the Ingredients:
    • Action: Blend or whisk the coconut cream, sugar (if using), and probiotic starter until smooth and uniform. If using capsules, open and mix the powder thoroughly.
    • Visual Cues: The mixture should be creamy, opaque, and slightly glossy, with no visible clumps of cream or probiotic powder. Additive-free coconut cream may separate (thick cream and watery liquid), so blending ensures a homogeneous base.
    • Sensory Cues: Smells like rich coconut with a hint of sweetness (if sugar is added). The texture is thick but pourable, like heavy cream.
    • Tips: Sterilize all equipment (jar, spoon, blender) to prevent contamination. If using a thickener, dissolve it in water, mix into the cream, and heat to 110°F (43°C) to activate, then cool to 100-110°F before adding probiotics.
  2. Setting Up the Jar:
    • Action: Pour the mixture into a sterilized 1-quart glass jar, filling ~2/3 to leave headspace for potential expansion. Cover with a breathable cloth (e.g., cheesecloth) or loosely screwed lid to allow slight gas release while protecting from dust.
    • What to Look For: The jar should be clean, with the mixture settling evenly. The loose cover ensures safety during fermentation.

Fermentation Stage (24 Hours at ~102°F): What to Look For
Ferment the mixture in a dehydrator, yogurt maker, or Instant Pot at 100-105°F (38-39°C) for 12-24 hours to achieve a tangy, probiotic-rich yogurt. Here’s what to expect:
  1. 4-8 Hours:
    • Visual Cues: Minimal change initially. You may see tiny bubbles forming at the edges or surface, indicating early probiotic activity. The mixture remains liquid and creamy, with no significant volume increase.
    • Sensory Cues: Smells mildly coconutty, with a faint tangy note starting. Taste (with a clean spoon) is still sweet and coconut-like, not yet yogurt-like.
    • What’s Happening: Probiotics begin metabolizing sugars (from the cream or added sugar), producing small amounts of CO2. Bubbles are a good sign of activity.
  2. 8-12 Hours:
    • Visual Cues: Small bubbles increase, especially at the edges, and may spread throughout. Slight expansion (5-10% volume increase) or a frothy surface may appear. The mixture starts to thicken slightly but remains pourable.
    • Sensory Cues: Smell becomes more tangy, like yogurt. Taste is mildly tangy, transitioning from coconut cream to yogurt.
    • What’s Happening: Probiotics are actively fermenting, producing more CO2 and lactic acid. The loose lid allows some gas to escape, but trapped bubbles create a slightly airy texture.
  3. 12-18 Hours:
    • Visual Cues: Noticeable expansion (10-20% volume increase) or puffiness, with bubbles throughout the mixture. The surface may look domed or frothy. The yogurt thickens, becoming less pourable and more creamy.
    • Sensory Cues: Smell is distinctly tangy, like commercial yogurt. Taste is tangy and yogurt-like, with a creamy, slightly effervescent mouthfeel.
    • What’s Happening: Peak fermentation occurs, with robust CO2 production creating an airy structure. The texture starts resembling Coconut Cult’s fluffy consistency.
  4. 18-24 Hours:
    • Visual Cues: Expansion peaks (10-20% or more), with a puffy, bubbly texture. The yogurt is noticeably thicker, holding its shape when stirred. Bubbles may be visible when gently stirred with a clean spoon.
    • Sensory Cues: Smell is strongly tangy, matching Coconut Cult’s yogurt. Taste is sharp, tangy, and creamy, with a rich, probiotic-packed flavor.
    • What’s Happening: Fermentation is near completion, maximizing probiotic content and tanginess. The airy, bubbly structure contributes to a fluffy texture post-refrigeration.
  • Safety Check: The yogurt should smell pleasantly tangy, never foul, alcoholic, or yeasty. Discard if mold or off odors appear (rare with sterilized equipment and 100-105°F).
  • Tips: Check at 12 hours for tanginess. If not tangy enough, continue to 24 hours. Use a clean spoon for tasting to avoid contamination. Keep the lid loose to prevent pressure buildup but trap enough gas for expansion.

Refrigeration Stage (8-12 Hours): What to Look For
After fermentation, refrigerate the yogurt for 8-12 hours to halt fermentation and set the texture.
  1. Visual Cues:
    • The yogurt may separate slightly, with a creamy layer on top and watery whey below (normal for additive-free coconut cream). After stirring, it should be smooth, creamy, and thick, resembling Coconut Cult’s custard-like texture.
    • Expansion from fermentation subsides, but the yogurt retains a slightly airy or effervescent quality when stirred.
  2. Sensory Cues:
    • Smell: Tangy, yogurt-like, with a faint coconut undertone.
    • Taste: Sharp, tangy, and creamy, matching commercial probiotic yogurt. Subtle sweetness (if sugar was used) enhances flavor.
    • Texture: Thick, creamy, and slightly fluffy, like a cross between Greek yogurt and custard. If using a thickener, it’s denser; without, it’s creamy but may need straining.
  3. What’s Happening:
    • Refrigeration solidifies the coconut cream’s fats, thickening the yogurt. The airy structure from fermentation adds fluffiness, mimicking Coconut Cult’s texture.
    • Stirring blends any separated whey for a uniform consistency.
  • Tips: Place in the coldest part of the fridge (e.g., back shelf). If not firm enough after 12 hours, strain through cheesecloth in the fridge for 1-2 hours to remove whey, achieving a thick, custard-like texture.

Troubleshooting Common Issues
  • No Expansion by 12 Hours: Check probiotic potency (use fresh, high-CFU starter) and ensure even mixing (blend, don’t stir). Secure the lid loosely from the start to trap CO2.
  • Soft Texture After Refrigeration: Extend refrigeration to 12 hours or strain for 1-2 hours. Use higher-fat coconut cream or add a thickener next time.
  • Mild Tanginess: Ferment up to 24-26 hours for stronger flavor, but avoid over-fermentation (yeasty taste).
  • Separation: Normal; stir gently or strain to remove excess whey.

Final Tips for Success
  • Choose High-Fat Cream: Use Thai Kitchen or Native Forest (~18-20g fat per 1/4 cup) for best firmness.
  • Blend for Uniformity: Blend ingredients to ensure even fermentation and texture.
  • Control Gas Retention: Loosely screw the lid to balance CO2 retention and release, promoting fluffiness.
  • Taste Early: Check at 12-18 hours to avoid over-fermentation.
  • Store Properly: Keep in an airtight container in the fridge for 5-7 days. Stir before serving if separation occurs.
By watching for these cues—bubbles and expansion during fermentation, tanginess in taste and smell, and a creamy, fluffy texture after refrigeration—you’ll know your coconut cream yogurt is on track to rival Coconut Cult’s. Enjoy your probiotic-packed creation in parfaits, smoothies, or as a tangy snack!
1 Comment

Ham & Beans - Instant Pot

9/12/2023

0 Comments

 
Picture
INGREDIENTS
2 pounds dried northern beans / navy beans / or black eyed peas
3-4 pounds - ham hocks or meaty ham bone
1/2 onion diced
1 bay leaf
8 cups water (not stock)​

INSTRUCTIONS
1. Place all of the ingredients in the Instant Pot. Lock the lid in place and set the valve to sealing.
2. Cook on high pressure for 45 minutes.
3. Allow a natural release of pressure for 15 minutes, then release the remaining pressure and open the lid.
4. If using bone-in ham - remove bone, shred ham, place back in beans. Stir and enjoy.
0 Comments

Instant Pot Pork Fried Rice

6/9/2022

0 Comments

 
Picture
INGREDIENTS
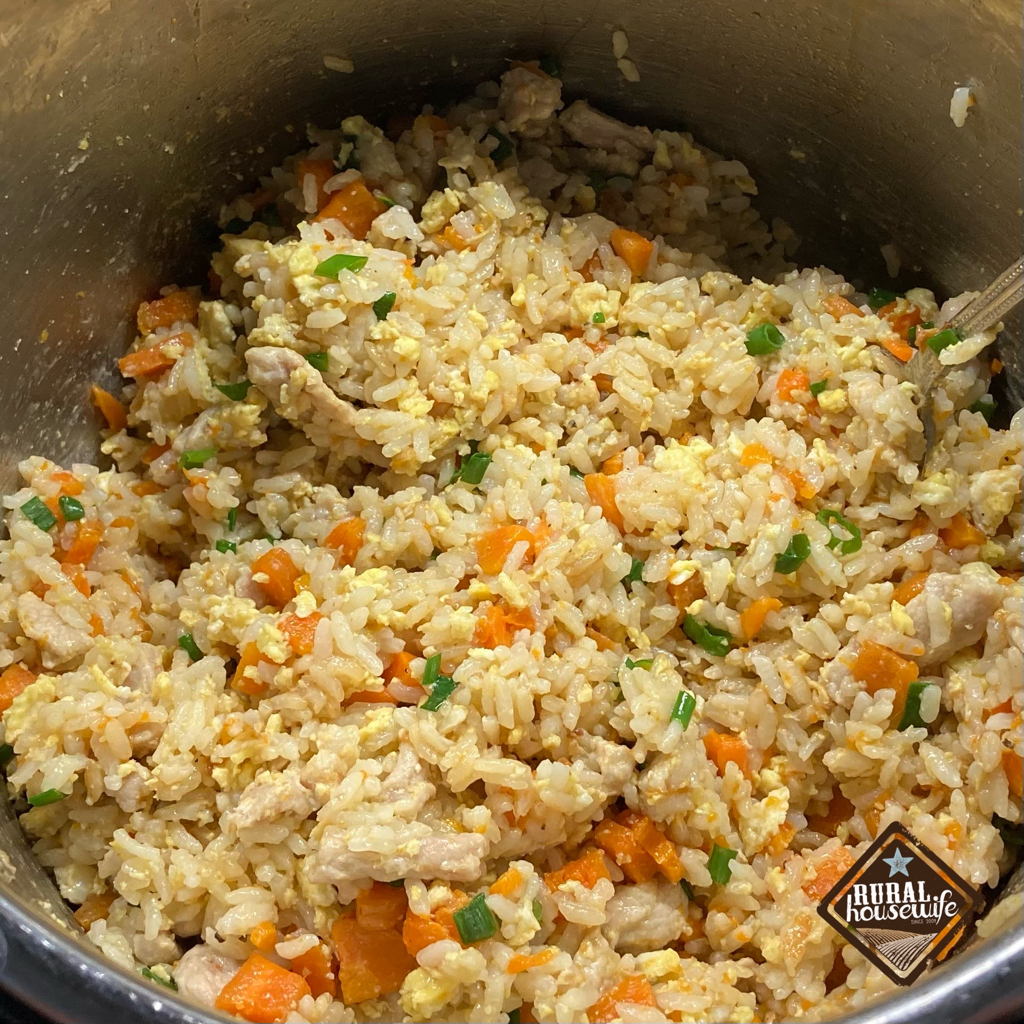
1/2 tablespoon olive oil
4 eggs, beaten
½ cup carrots, diced
1 clove fresh garlic, minced
1/2 cup boneless pork cutlets (or chicken) cut into short, thin slices
1 1/2 cups short grain rice (like Calrose Botan Sushi Rice)
1 1/2 cup chicken broth
1 green onion stem, chopped
1 tablespoon soy sauce (or more if you like)

DIRECTIONS
  1. Turn on the sauté function on the Instant Pot. Heat oil over high heat for 2 minutes until the hot oil sizzles. Add beaten eggs, and stir until scrambled and cooked through, about 1 minute.
  2. Add carrots, garlic, rice, and pork - sauté until evenly mixed and tender, about 2 minutes. The pork doesn't need to be cooked all the way through at this point.
  3. Add broth and stir well until evenly mixed.
  4. Switch to pressure cooking mode on manual high and seal the lid. Let the fried rice pressure cook for 5 minutes. Once the time is up, let the fried rice sit in the pot for another 8-10 minutes. This allows the pressure to release slowly, making rice and pork tender. Quick release the remaining pressure.
  5. Remove the lid and stir in green onions and soy sauce. Serve immediately.

0 Comments

Hamburger Vegetable Soup

11/2/2021

0 Comments

 
Picture
INGREDIENTS
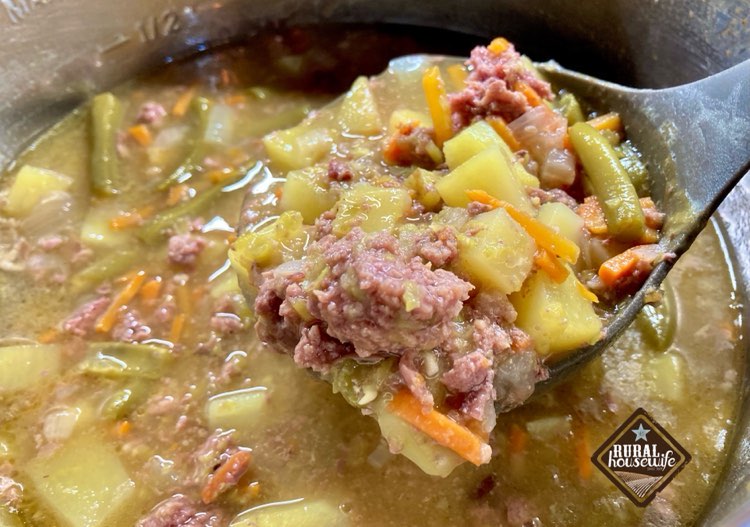
1 small yellow onion, diced

2 carrots, peeled and chopped
1 can green beans
1 cup split peas
3 Yukon potatoes, diced into small pieces
8 cups beef bone broth
1 pound ground meat
1 tbsp Cumin
1 tbsp salt

INSTRUCTIONS
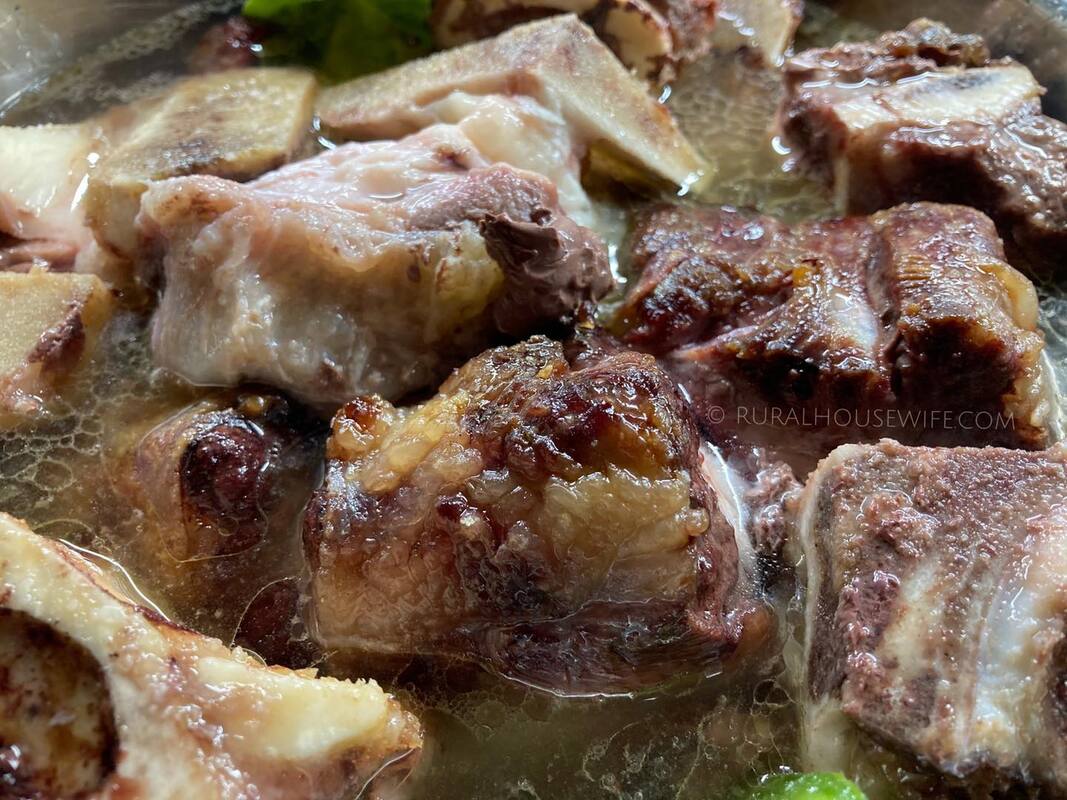
  1. Add all ingredients to Instant Pot in order of ingredient list.
  2. Close lid, set pressure to sealing and pressure cook on high for 15 minutes. Instant Pot will take approx. 20 minutes to come to pressure. After cooking is completed, quick release pressure from Instant Pot.
0 Comments
<<Previous
    Picture
    Picture
    Explore the New Mountain Rose Journal & Catalog

    Picture

    Categories

    All
    365 Days Of Thanks
    Adventures
    Appetizers / Side Dishes
    Baked Goods
    Being A Wife
    Bible Study
    Bread
    Breakfast
    Budget Fun
    Canning
    Chocolate
    Chocolate Mondays
    Christmas
    Cookies
    Craft Nights
    Crafts
    Dairy Free
    Dehydrator
    Dinner
    D I Y
    E-BOOKS
    Eggs
    Experiments
    Farm Girl
    Freeze Dried
    Furniture
    Gift Ideas
    Gluten Free
    Green Tomatoes
    Halloween
    Handmade
    Herbal Remedies
    Homemade
    Ice Cream
    InstantPot Recipes
    Leather
    Low Sodium
    Make Ahead Meals
    Meals In A Jar
    Mexican Favorites
    Mothers Day
    Mug Recipes
    My Attempt At Gardening
    My Attempt At Sewing
    My Faith
    My Life
    Natural Beauty
    Our Town
    Painting
    Photography
    PRINTABLES
    Pumpkin
    Quick Fixin's
    Recipe
    Recycle
    Rice Cooker Recipes
    Slow Cooker Fridays
    Snacks
    Soup
    Sourdough Discard
    Spice Mixes
    Sugar Free
    Thanksgiving
    Tutorials
    Using Food Storage
    Valentines
    Vegan
    Videos
    Wheat
    Wood Projects


    Support this Site
    Shop with any of the companies below to support this site! Simply click on their image to start shopping—it won't cost you a thing.
Picture
This is a great resource page for gardeners that are just beginning and those that have been doing it a long time.
Picture
On the go a lot? Don't have time to always make a wholesome dinner for your family? Check out these recipes to get you ahead of the game.
Picture
How to's, ideas, inspiration, books, and so much more for learning how to can and preserve your food.
Copyright 2009 - 2025 Rural Housewife™ | Powered by The New KJV

SUPPORT THIS SITE: Shop with any of the companies below to support this site! Simply click on their image to start shopping—it won't cost you a thing.
Picture
Picture
Picture
Picture
Picture
Picture
Picture
Picture
Picture
Picture